Original Pentair IntelliFlo & WhisperFlo Swimming Pool and Spa Pump Seal Kit 356198
Original Pentair IntelliFlo & WhisperFlo Swimming Pool and Spa Pump Seal Kit 356198 is used on the following pumps:
- IntelliFlo
- IntelliFlo VS
- IntelliFlo VS 3050
- IntelliFlo VSF
- IntelliFlo VS+SVRS
- IntelliPlo VS
- IntelliFlo VF
- IntelliFlo VST
- IntelliFlo 2 VST
- IntelliFlo i1
- IntelliFlo i2
- WhisperFlo
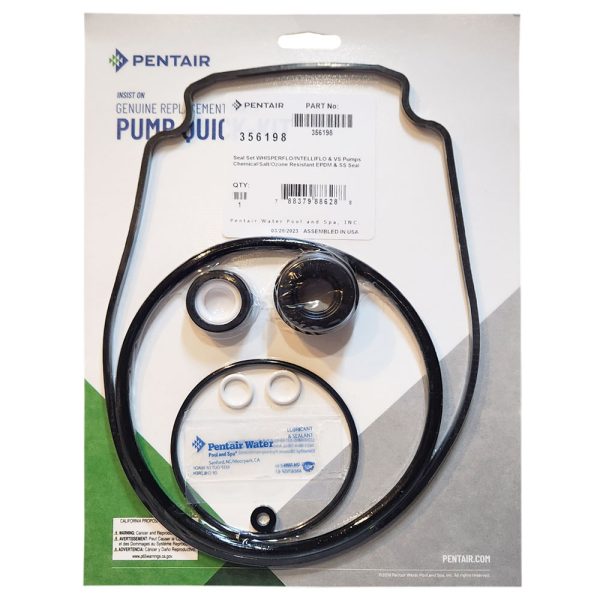
Original Pentair IntelliFlo & WhisperFlo Swimming Pool and Spa Pump Seal Kit 356198 Includes:
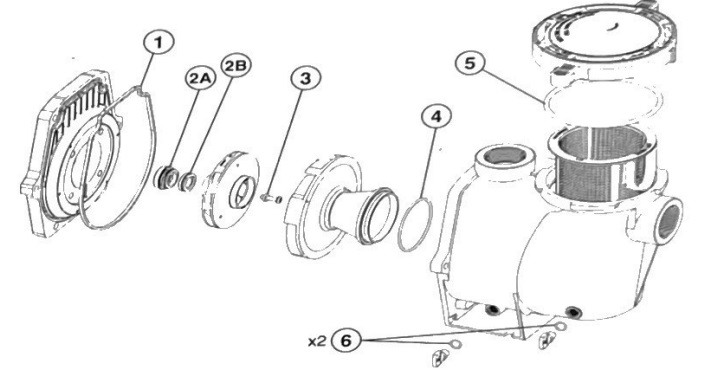
- Seal Plate Gasket: P/N 357100Z
- Shaft Seal Assembly (salt/ozone resistant): P/N 071732S – 2A(Spring Seal), 2B(Ceramic Seal)
- Impeller Screw Washer: P/N 075713
- Diffuser O-ring: P/N 355227Z
- Strainer Pot O-ring: P/N 350013Z
- Drain Plug O-rings (Quantity 2): P/N 192115Z
Original Pentair IntelliFlo & WhisperFlo Swimming Pool and Spa Pump Seal Kit 356198Installation:
- Removing the existing shaft seal:
- Refer to the pump Installation and User’s Guide and complete all prerequisite disassembly instructions.
- Hold the motor shaft in place at the rear of the motor and unscrew the impeller counter-clockwise. Remove it from the motor shaft.
- Using a small flat-blade screwdriver, gently pry the old Ceramic Seal out of the Impeller (Figure A). Note: The impeller seal cavity can be damaged if too much force is used when removing the Ceramic Seal.
- Using a 9/16-inch wrench, remove the four bolts securing the seal plate to the motor. Set the motor aside.
- Place the Seal Plate face down on a flat surface and tap out the old Spring Seal with flat-blade screwdriver (Figure B).
- Installing the new shaft seal:
- Flip the seal plate over and thoroughly clean the seal plate seal cavity.
- Using a silicone sealant, lightly coat the metal flange of the new Spring Seal.
- With the Carbon Face outwards, position the new Spring Seal inside the seal cavity (Figure C).
- Place a clean piece of 1-1/4′ PVC or deep-well socket over the Spring Seal face and gently tap it into the seal plate.
- Using a clean cloth, thoroughly clean the seal face.
- Ensure the side marked ‘BOTTOM’ is at the bottom and install the seal plate onto the motor. Tighten the four bolts to 70-80 in-lbs. (81-92 kg/cm).
- Throughly clean the impeller seal cavity and lubricate the outer rubber edge of the new Ceramic Seal with provided lubricant.
- With the White Face facing away from the impeller, firmly press it into the impeller seal cavity with your thumbs.
- Using a clean cloth, thoroughly clean the seal face.
- Hold the motor shaft in place at the rear of the motor and hand tighten the impeller clockwise onto the motor shaft (Figure D).
- Refer to the pump Installation and User’s Guide and complete all remaining reassembly instructions.


Reviews
There are no reviews yet.